Custom Reports allow you to export customer details, leads information, stock details from Dealer Studio as a CSV file.
You can choose which customer details to include and apply filters such as date range, lead status, source, tags, and marketing consent.
Before You Start
Before creating a Contact Custom Report:
Sign in to the Dealer Studio dashboard.
Make sure you have permission to access Contact Reports.
If you see Access denied, contact your dealership manager.
Make sure Two-Factor Authentication (2FA) is enabled on your account.
If 2FA is not enabled, you will be prompted to set it up before accessing reports.
Open Contact Reports
Go to Contacts in your dealership dashboard.
Select Reports.
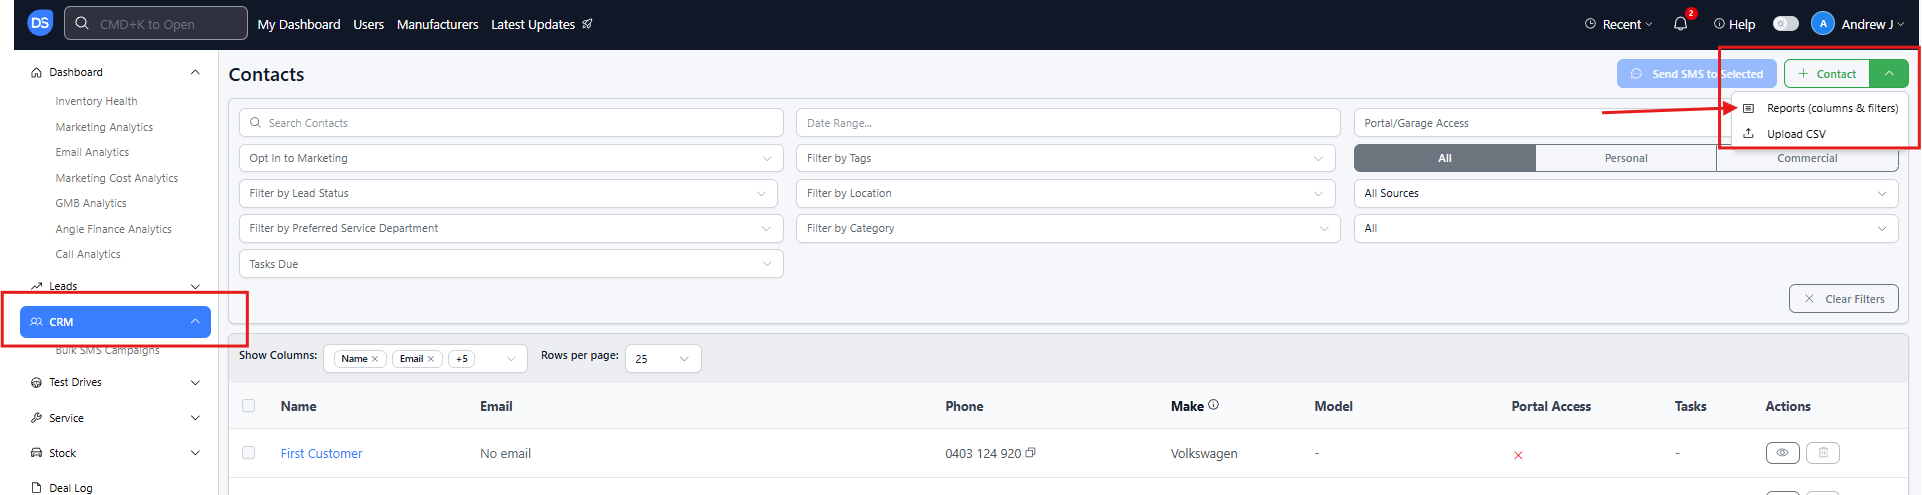
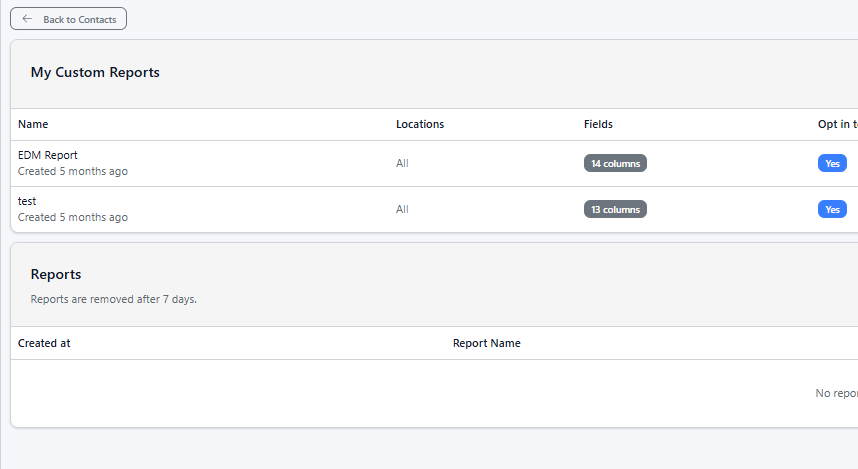
You will see two sections:
My Custom Reports — Your saved report templates.
Reports — Generated CSV files that are available to download.
Note: Generated reports are available for 7 days before they expire.
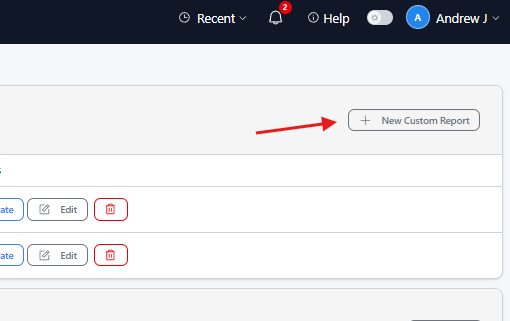
Create a New Custom Report
Under My Custom Reports, click New Custom Report.
Enter the required report details.
Click Add Report.
Report Settings
| Setting | Required | Description |
|---|---|---|
| Name | Yes | The name of your report, such as Customer details export. |
| Fields | Yes | Select the customer details you want included in the CSV. |
| Date Range | No | Filter contacts based on when they were created. |
| Lead Statuses | No | Only include contacts associated with selected lead statuses. |
| Contact Type | No | Filter between personal and commercial contacts. |
| Source | No | Filter contacts by their source. |
| Tags | No | Filter contacts using specific tags. |
| Only contacts opted in to marketing | No | When enabled, only contacts who have opted in to marketing are included. |
Marketing Opt-In
The Only contacts opted in to marketing option is enabled by default.
Keep this enabled when creating a marketing contact list.
If you need to export all contacts for internal purposes, you can turn this option off. Be mindful of your organisation's privacy and marketing requirements when exporting opted-out contacts.
Recommended Setup for a General Customer Export
For a general customer details export:
Name: Enter a name such as
Customer details export.Fields: Keep the default fields or add additional fields as required.
Date Range: Leave blank to include all contacts, or select a date range.
Marketing Opt-In: Keep enabled if the list will be used for marketing.
Click Add Report.
Available Customer Fields
You can select which fields are included in your CSV export.
Default Fields
| Field | Description |
|---|---|
id | Contact ID |
first_name | First name |
last_name | Last name |
full_name | Full name |
email | Email address |
phone_number | Phone number |
postcode | Postcode |
business_name | Business name, if applicable |
contact_type | Personal or commercial |
source | Contact source |
created_at | Date the contact was created |
opt_in_to_marketing | Whether the contact has opted in to marketing |
tags | Contact tags |
Additional Fields
You can also add fields such as:
| Field | Description |
|---|---|
updated_at | Date the contact was last updated |
signed_in_to_portal | Whether the contact has signed in to the portal |
preferred_service_department_name | Preferred service department |
last_lead_cluster_status_name | Status of the contact's latest lead |
secondary_phone_number | Secondary phone number |
title | Contact title |
date_of_birth | Date of birth |
next_service_date | Next service date |
next_service_time | Next service time |
primary_car_stocknum | Primary vehicle stock number |
primary_car_make | Primary vehicle make |
primary_car_model | Primary vehicle model |
primary_car_year | Primary vehicle year |
Generate and Download the CSV
Creating a custom report only saves the report settings. You need to generate the report before you can download the CSV.
Find your report under My Custom Reports.
Click Generate.

Wait for the report to finish generating.
If necessary, click Refresh data to check the latest status.
Once the report is ready, click Download.
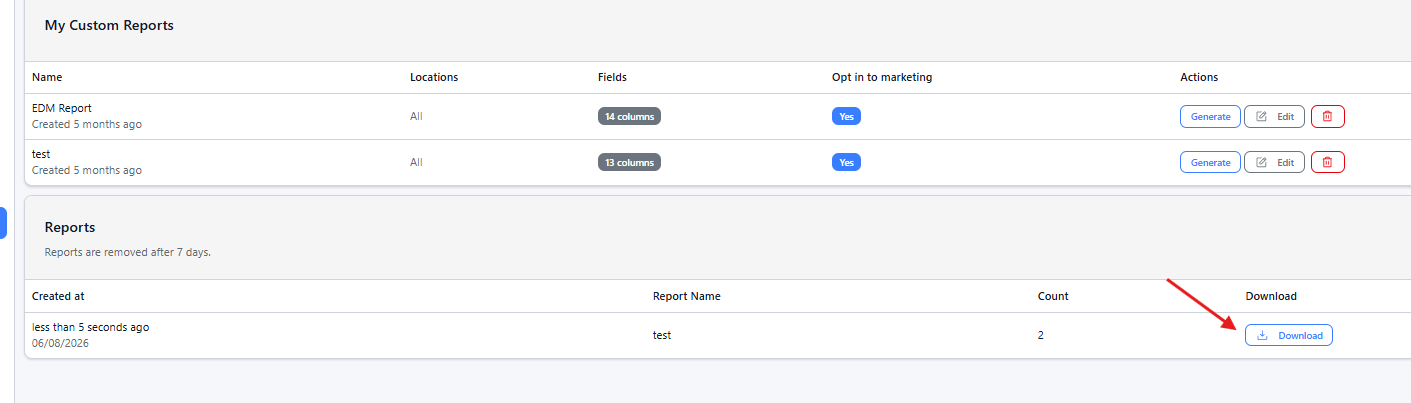
The CSV file will be downloaded to your computer.
Note: Large reports may take some time to generate. Please wait for 1-3 minutes, then refresh the page.
Important: Due to security reasons, generated reports are automatically removed after 7 days. If you need the report again after this period, generate a new copy.
Edit or Delete a Custom Report
You can manage your saved reports from My Custom Reports.
| Action | Instructions |
|---|---|
| Edit | Click Edit, make your changes, then click Update Report. |
| Delete | Click the trash icon to remove the saved report. |
Note: Editing a report does not automatically generate a new CSV. Click Generate after making changes to create an updated file.
Common Report Examples
| Goal | Recommended Settings |
|---|---|
| Marketing list | Keep marketing opt-in enabled; include name, email and phone |
| New customers this month | Set Date Range to Current month |
| Customers by lead stage | Select the relevant Lead Statuses |
| Customers from a specific channel | Select the relevant Source |
| Full internal customer export | Turn off marketing opt-in and leave other filters blank |
Troubleshooting
| Issue | Solution |
|---|---|
| Two-factor authentication required | Enable 2FA using the link provided on the page, then reload Contact Reports. |
| Access denied | Ask your dealership administrator to provide access to Contact Reports. |
| CSV is empty or shows 0 contacts | Check your filters, particularly the marketing opt-in and date range settings. Try widening or removing the filters. |
| Download button isn't showing | The report may still be generating. Click Refresh data and check the report status. |
| A previous report is no longer available | Generated reports expire after 7 days. Generate the report again. |
Need Help?
If you need assistance creating or downloading a Contact Custom Report, contact Dealer Studio Support.
Was this article helpful?
That’s Great!
Thank you for your feedback
Sorry! We couldn't be helpful
Thank you for your feedback
Feedback sent
We appreciate your effort and will try to fix the article